목표
Database 에 있는 author 테이블을 이용해 저자(author) 관리창을 구현합니다.
아래는 완성된 저자 관리창 입니다.
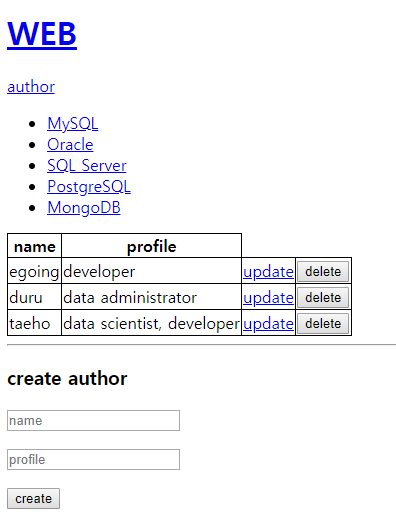
홈페이지에서 author 링크를 클릭하면 저자 관리창으로 진입합니다.
저자 관리창에서 저자 리스트를 바로 볼 수 있고, 수정 및 삭제를 할 수 있습니다.
하단에 저자 생성을 위한 form 이 있고, 이 form 은 수정 버튼을 누를 시 수정을 위한 form 으로 대체됩니다.
이러한 기능을 구현하는 코드를 작성해 보겠습니다.
저자 관리창 만들기
template.js
1
2
3
4
5
6
7
8
9
| HTML:function(title, list, body, control){
<body>
<h1><a href="/">WEB</a></h1>
<a href="/author">author</a> // 저자 관리창 링크 생성
${list}
${control}
${body}
</body>
}
|
template에서 기본적인 창 구성을 담당하는 HTML 메소드에 저자 관리창으로 향하는 링크를 생성합니다.저자 링크는 /author 로 하겠습니다.
main.js
1
| else if(pathname === '/author') author.home(request, response);
|
main.js 에 저자 관리창에 링크됐을 시 작동하는 if 문을 추가해줍니다.
author.js
1
2
3
4
5
6
7
8
9
10
11
12
13
14
15
16
17
18
19
20
21
22
| exports.home = function(request, response){
db.query(`SELECT * FROM topic`, function(error, topics){
db.query(`SELECT * FROM author`, function(error, authors){
var title = 'author';
var list = template.list(topics);
var authorList = template.authorList(authors);
var create = `
<hr>
<h3>create author</h3>
<form action="/author_create_process" method="post">
<p><input name="name" placeholder="name"></p>
<p><input name="profile" placeholder="profile"></p>
<p><input type="submit" value="create">
</form> `;
var html = template.HTML(title,list,authorList+create,
``);
response.writeHead(200);
response.end(html);
});
});
}
|
이제 author.js 를 만들어 저자 관리창의 기능들을 담당하는 모듈을 만들면 됩니다.
제일 기본적인 home 창부터 만들었습니다.
대체로 topic.js 의 코드와 비슷한데, authorList 와 create 변수가 추가된것이 다릅니다.
authorList 는 Database 에 있는 모든 저자 리스트를 보여주고 있고, template.js 에 구현되어 있습니다.
create 변수는 저자 생성에 필요한 form 문을 담았습니다.
아래는 template.js 의 authorList 구현 코드입니다.
template.js
1
2
3
4
5
6
7
8
9
10
11
12
13
14
15
16
17
18
19
20
21
22
23
24
25
26
27
28
29
| authorList:function(authors){
var body = '<table>';
body += `
<tr>
<th>name</th>
<th>profile</th>
</tr>`;
for(var i in authors){
body += `
<tr>
<td>${authors[i].name}</td>
<td>${authors[i].profile}</td>
<td>
<a href="/author_update?id=${authors[i].id}">update</a>
</td>
<td>
<form action="author_delete_process" method="post">
<input type="hidden" name="id" value="${authors[i].id}">
<input type="submit" value="delete">
</form>
</td>
</tr>`
}
body += '</table>';
return body;
}
|
<table> 태그를 이용해 저자 목록을 담도록 하였습니다.
“SELECT * FROM author“ 쿼리문의 결과를 authors 변수에 담았고,
이 변수에 있는 name, profile, id 를 for문을 통해 하나씩 가져오도록 하였습니다.
태그 참고1
2
3
4
5
6
7
8
9
10
11
12
13
14
| <table>
<tr> // tr 은 table row 의 약자.
<th>번호</th> // th: table header
<th>이름</th>
</tr>
<tr>
<td>1</td> // td: table data
<td>joyoon</td>
</tr>
<tr>
<td>2</td>
<td>someone</td>
</tr>
</table>
|
그리고 위의 코드는 아래와 같이 나타내어집니다.
나머지 저자 관리창의 CRUD 는 topic.js 를 구현하는 방식과 같습니다.
전체 소스 코드
github 링크